 |||
|||
I have this 2012 iMac. It’s been on every day and night since I bought it. That’s around 1400 days of pretty much non-stop service save a restart here and there along the way. I use it as a Plex server, a home for my Drobo, my iTunes and Photo library home, and my Backblaze online backup hub.
Building a Fusion Drive isn’t a walk in the park, but it’s worth it.
Bonus tip: Backblaze backs up any hard drive directly connected to it, so I plug in the portable drive my lady uses to clone her laptop, and I get a copy of that backup in Backblaze’s cloud too.
Sadly, the hard drive was getting a little flaky, and as a result the computer has become virtually unusable the last couple months. Even copying a simple file took forever.
{% capture images %}  {% endcapture %}
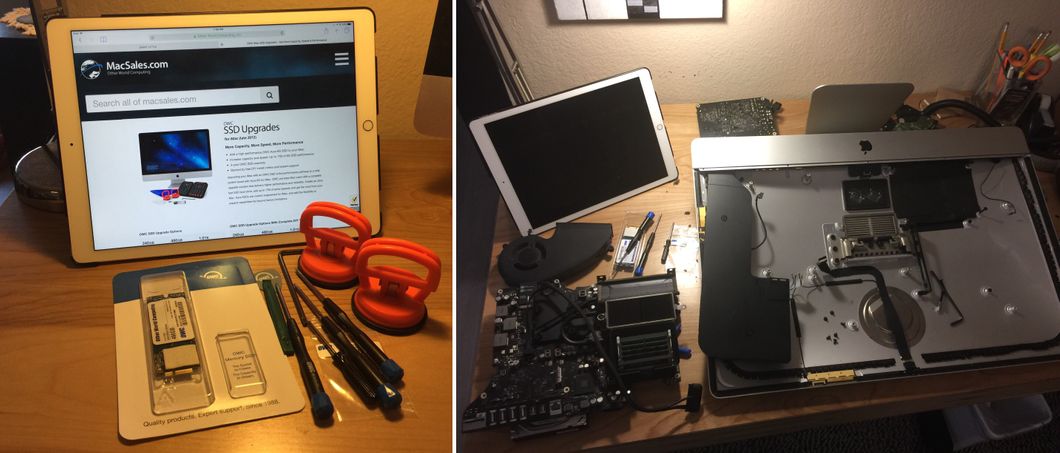
So, I decided to take the plunge and upgrade. After some research, I discovered that I can put an SSD into the 27” iMac. I also discovered I can roll my own Fusion Drive. So, of course, I did it.
Now, I’m gonna warn you, this is not for the faint of heart. The iMac’s screen is glued on, and the SSD slot is (unnecessarily, I might say) buried in the deepest recess of the iMac. I’m not going to do a step-by-step here, but a quick overview of the process.
My iMac has been a workhorse for years. It’s still in great shape, and the only issue was the hard drive. I could have just replaced the hard drive, but a little more effort and time got me a lot more speed and a little more room. Updating a Mac is usually worth the effort. Macs run forever and are supported for years.
The first thing (after all the backups, of course…) I had to do was get the screen off. This is a pain. Running this guitar-pick-looking thing around the glass splits the glue and lets me get the screen off. The only good part about this process is the glass is laminated to the display, so you don’t get that annoying thing where dust or hair gets behind the glass. Did I mention it’s a pain? I deserve some wine. Here are the guts:
{% capture images %}  {% endcapture %}
Peeling the glue gunk off the back of the screen and the iMac frame is a bitch, but if you can get under a corner it’ll peel right up like three day old sunburnt skin.
Following the video, I removed about 6,000 screws, cables, and what not to get to the logic board. As you can see in the picture above, changing out the hard drive would be nothing at this point. It’s the SSD slot that makes it tough. For some reason, Apple decided to put the SSD slot (which is tiny) on the underside of the logic board. Jerks.
Now, after all those screws and wine, you end up with a pile of parts and a loose logic board. Congratulations. Top off that wine.
{% capture images %}  {% endcapture %}
Next comes the fun part. On the bottom of the logic board, you plug in the SSD. 480GB of marvelous speed and power. Woo hoo! I deserve a drink.
{% capture images %}  {% endcapture %}
Cool, now I just have to follow the instructions in reverse. The engineering inside this machine is pretty incredible. It’s amazing how well fitted and detailed the parts are, when in reality most people will never see them.
Once all the bits and bobs are back in, (I also replaced the 1TB hard drive with a new one to be safe) it’s time to test. I actually rebuilt the system software with the display taped into place, in case something went wrong. The last thing I wanted to do was cut through all that damn screen glue again.
Plug in that bootable USB stick and let the installer load. Launch Terminal, which runs off the USB stick. Following Macworld’s instructions, I made my two drives into one big Fusion Drive. Once that was done, shut the Mac down, then restart holding the option key. Click the installer and let El Capitain install itself. Have a glass of wine, this will take a while.
Once the OS is installed, it’ll ask where to get data. I chose “Restore from Time Machine Backup” and had a glass of wine. Then I went to bed, because:
{% capture images %}  {% endcapture %}
I woke up the next day and it was done. I ran a few tests to check some stuff, and was so freakin’ happy. The night before, it was taking several minutes to copy a file, now that same file copied so fast the progress bar didn’t even have time to show on screen. Rebooting before took several minutes. Now, it takes 38 seconds. Mission accomplished, so the screen got glued back on with the adhesive that came with the OWC kit, and it looks like I never pried this thing apart.
For just a little over $240, I have what feels like a brand new computer that will give me a few more years of service. And the best part is, by using a Time Machine backup, I was back up and running right where I left off the day before.