 |||
|||
I’m not a super heavy Instagram user, but I do occasionally post. When I do, I like to save what post to this blog. Why? Maybe because I’m not a huge Facebook fan and contemplate deleting all my Facebook-owned data weekly. Maybe because I like to see where my Instagram posts fit in with all my other random thoughts. Maybe a little of both. I struggled for a while to try to figure out how to do this automatically, and I found the answer in the Shortcuts App for iOS. Together with my Githuib client, Working Copy, it’s now a one-button operation. I love the Shortcuts app, and will be posting a lot more about it in the coming months.
I have two main requirements for my Instagram Scraping Machine.
This shortcut will embed any Instagram post, not just your own. If you’re into quoting Instagram posts on your blog, this may help a bit.
There are a lot of things happening in this Shortcut, so buckle up. Here we go. If you want to follow along, grab the shortcut here. You’ll also need to build a Github Credentials sub-Shortcut if you’re planning on storing this in Github, which I do for my Jekyll-powered site. That’s a whole other story.
Create the shortcut, and set it to “Show in Share Sheet” and accept Safari Web Pages and URLs. This will prevent it from showing up in every share sheet, but it will appear when you share a URL.
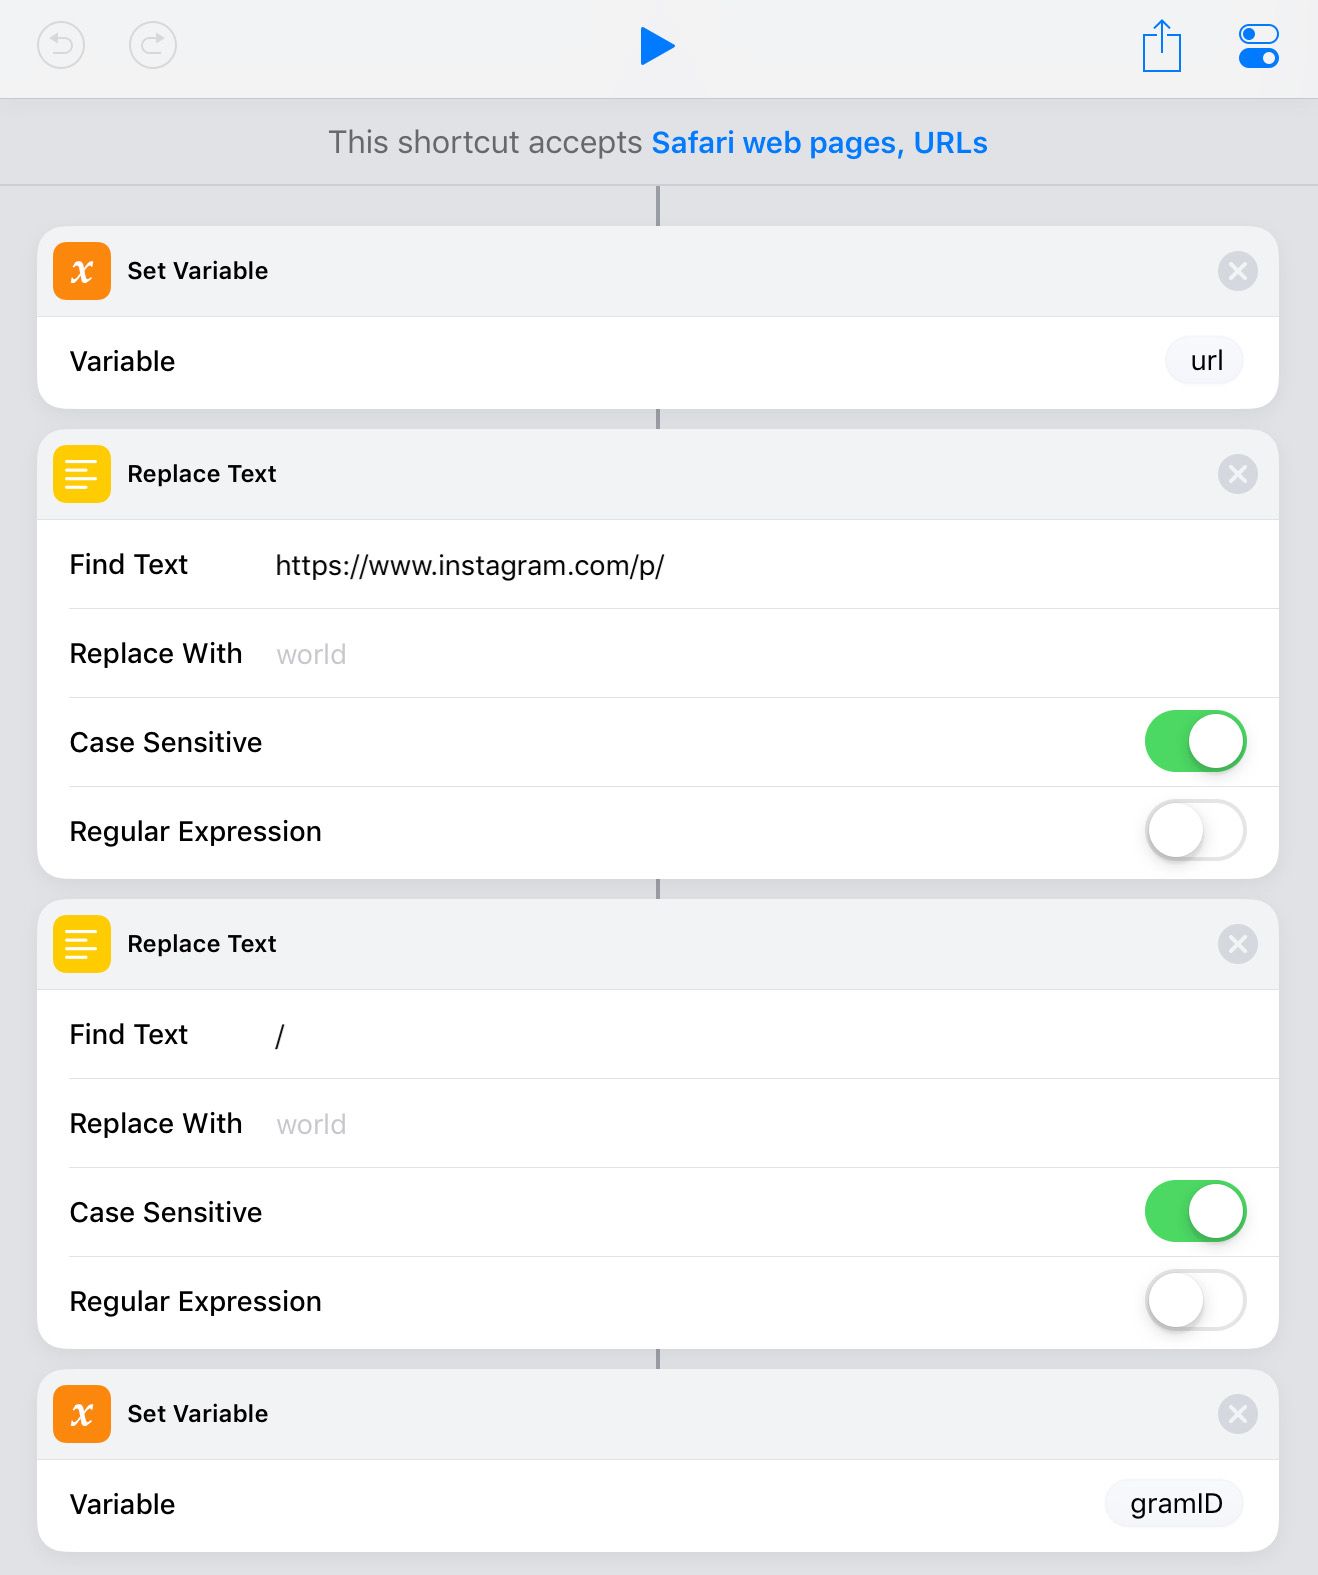
First action is to save the URL to a variable. I cleverly name it url.
Next, we add a couple of Replace Text actions that remove the URL part of the URL. The first removes https://www.instagram.com/p/ and the second removes the trailing /. This leaves just the Instagram ID, which is saved as a variable. (Yes, I know Magic Variables are a thing, but I find it quicker to just create a variable than to rename a Magic Variable.)
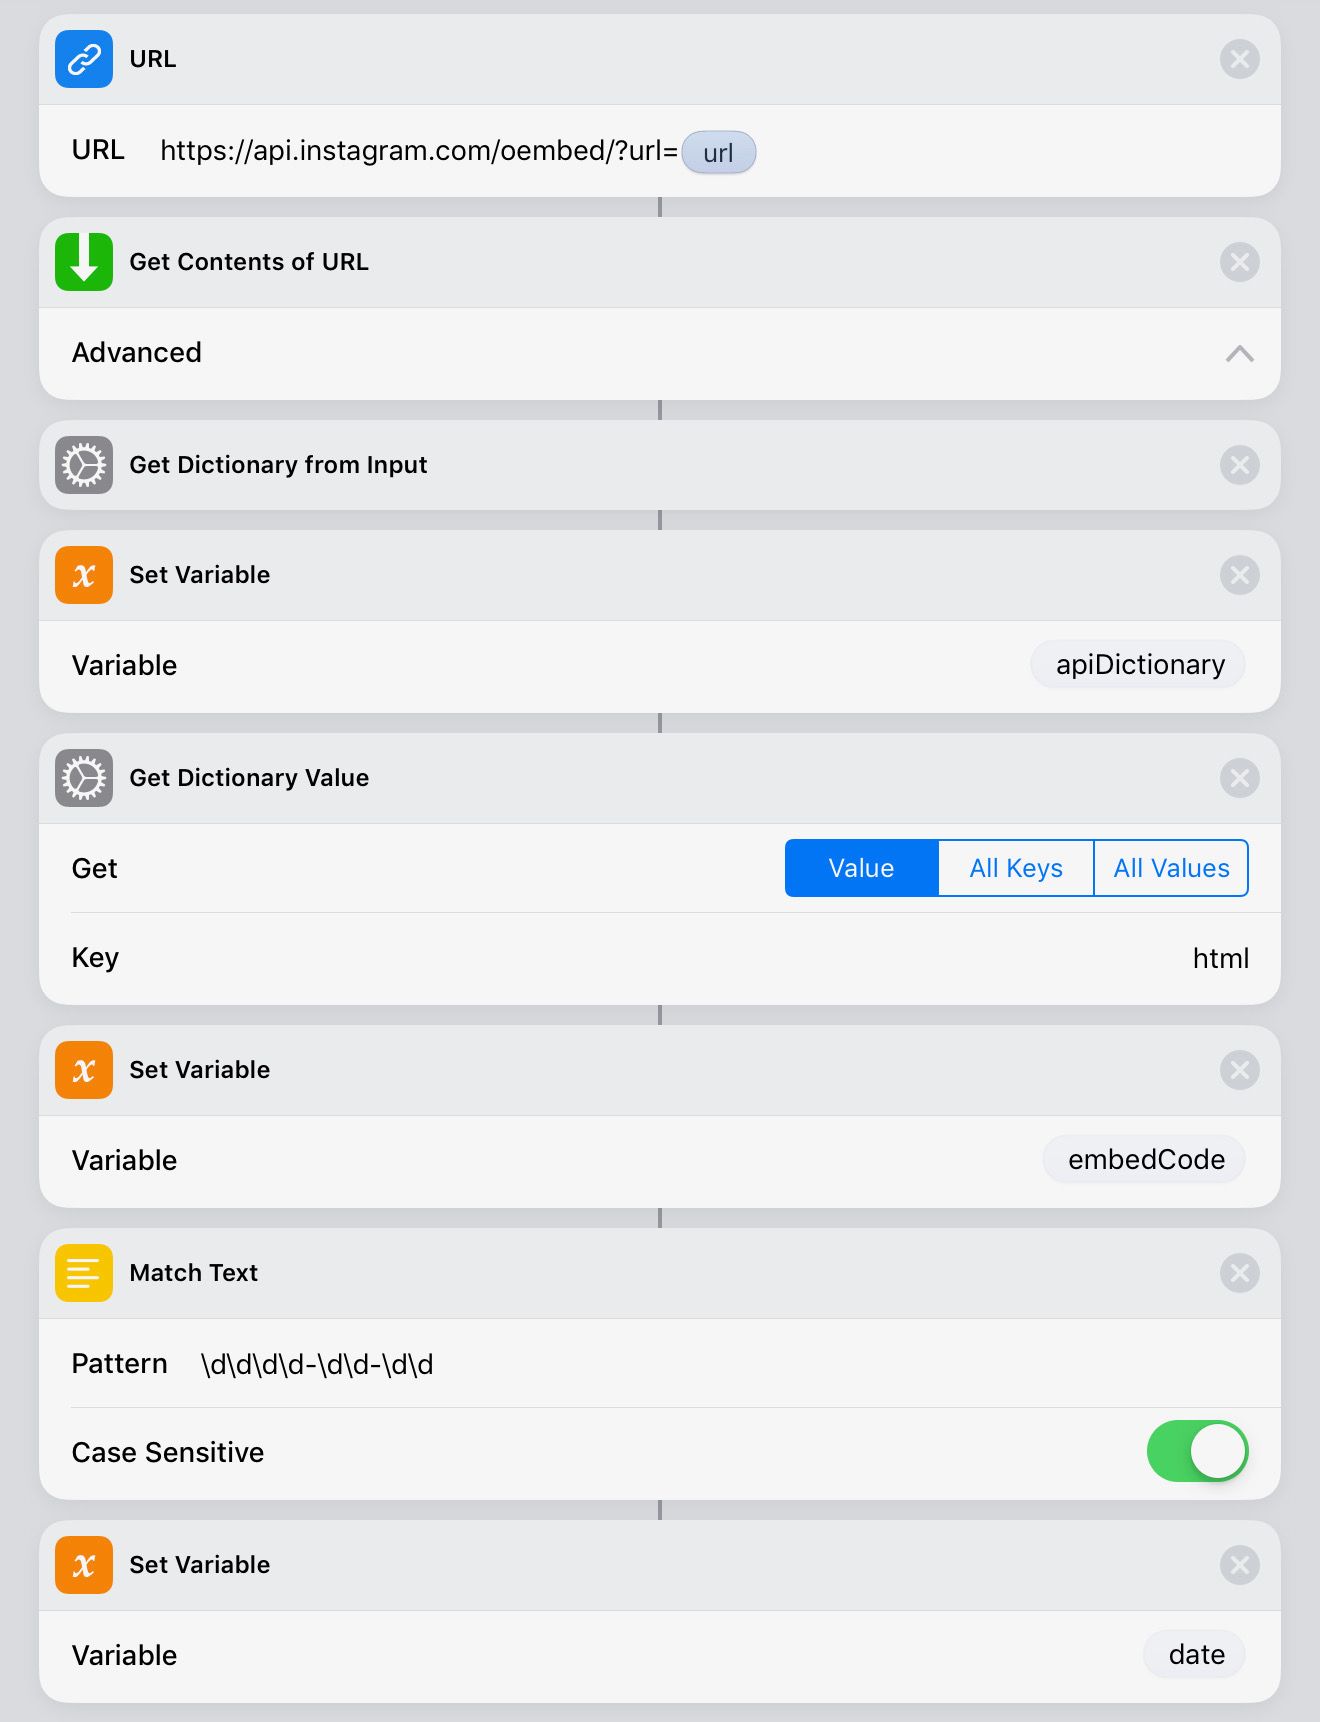
Then, we send the url variable into the Instagram API.
https://api.instagram.com/oembed/?url=[URL VARIABLE]
This pulls the embed code from Instagram. Get Contents of URL downloads the embed, which is partially JSON. Then, we Get Dictionary from Input and Set Variable as apiDictionary so we can call it back up a couple times.
To get the actual embed code, Get Dictionary Value of the html key. This value is saved as the embedCode variable. Then, we look through the embed code to find the date. There is only one date in the code, so we can pull that pretty easily using a regular expression \d\d\d\d-\d\d-\d\d.
Save that as date variable. We’ll use it in the YAML to set the blog post’s date. I pull it from the Instagram API to make sure the date of the post matches the date of the Instagram, in case I don’t run the Shortcut immediately.
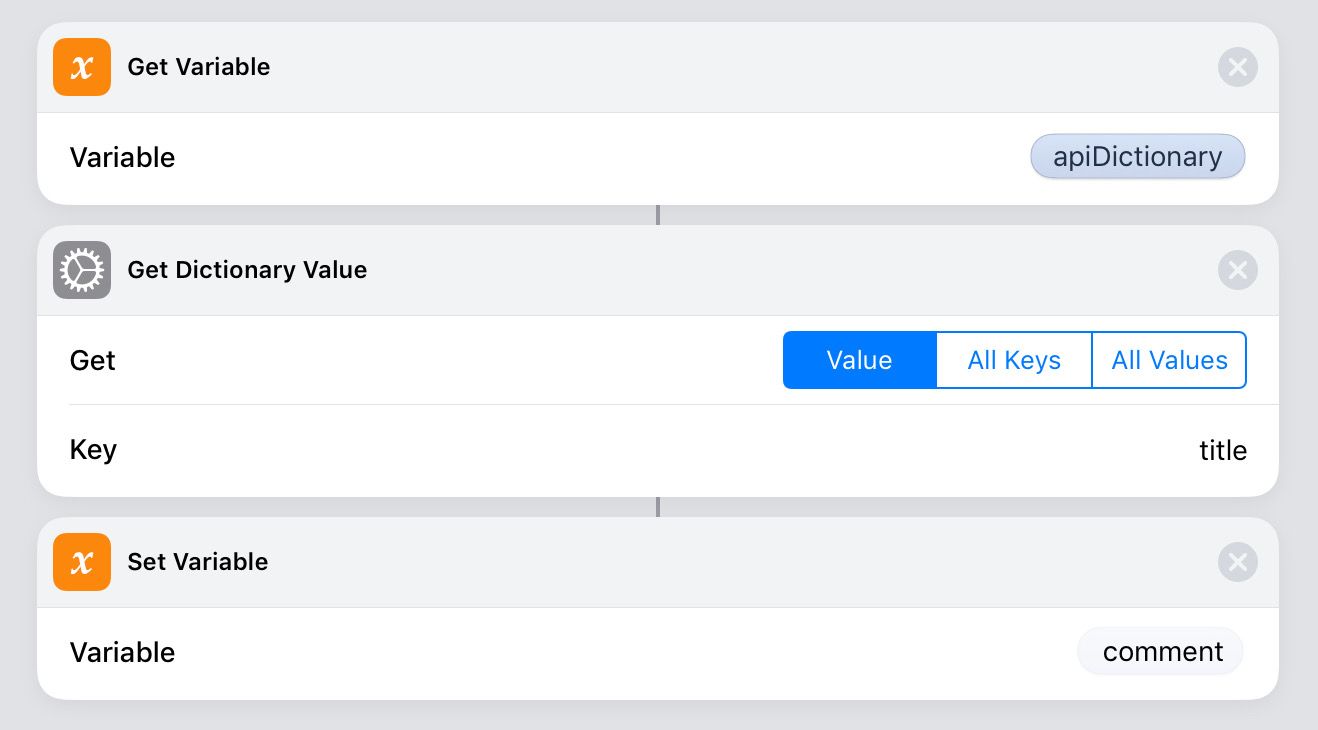
Grab that apiDictionary variable again and get the value of title. This will be saved as the content of the blog post. Set a comment variable.
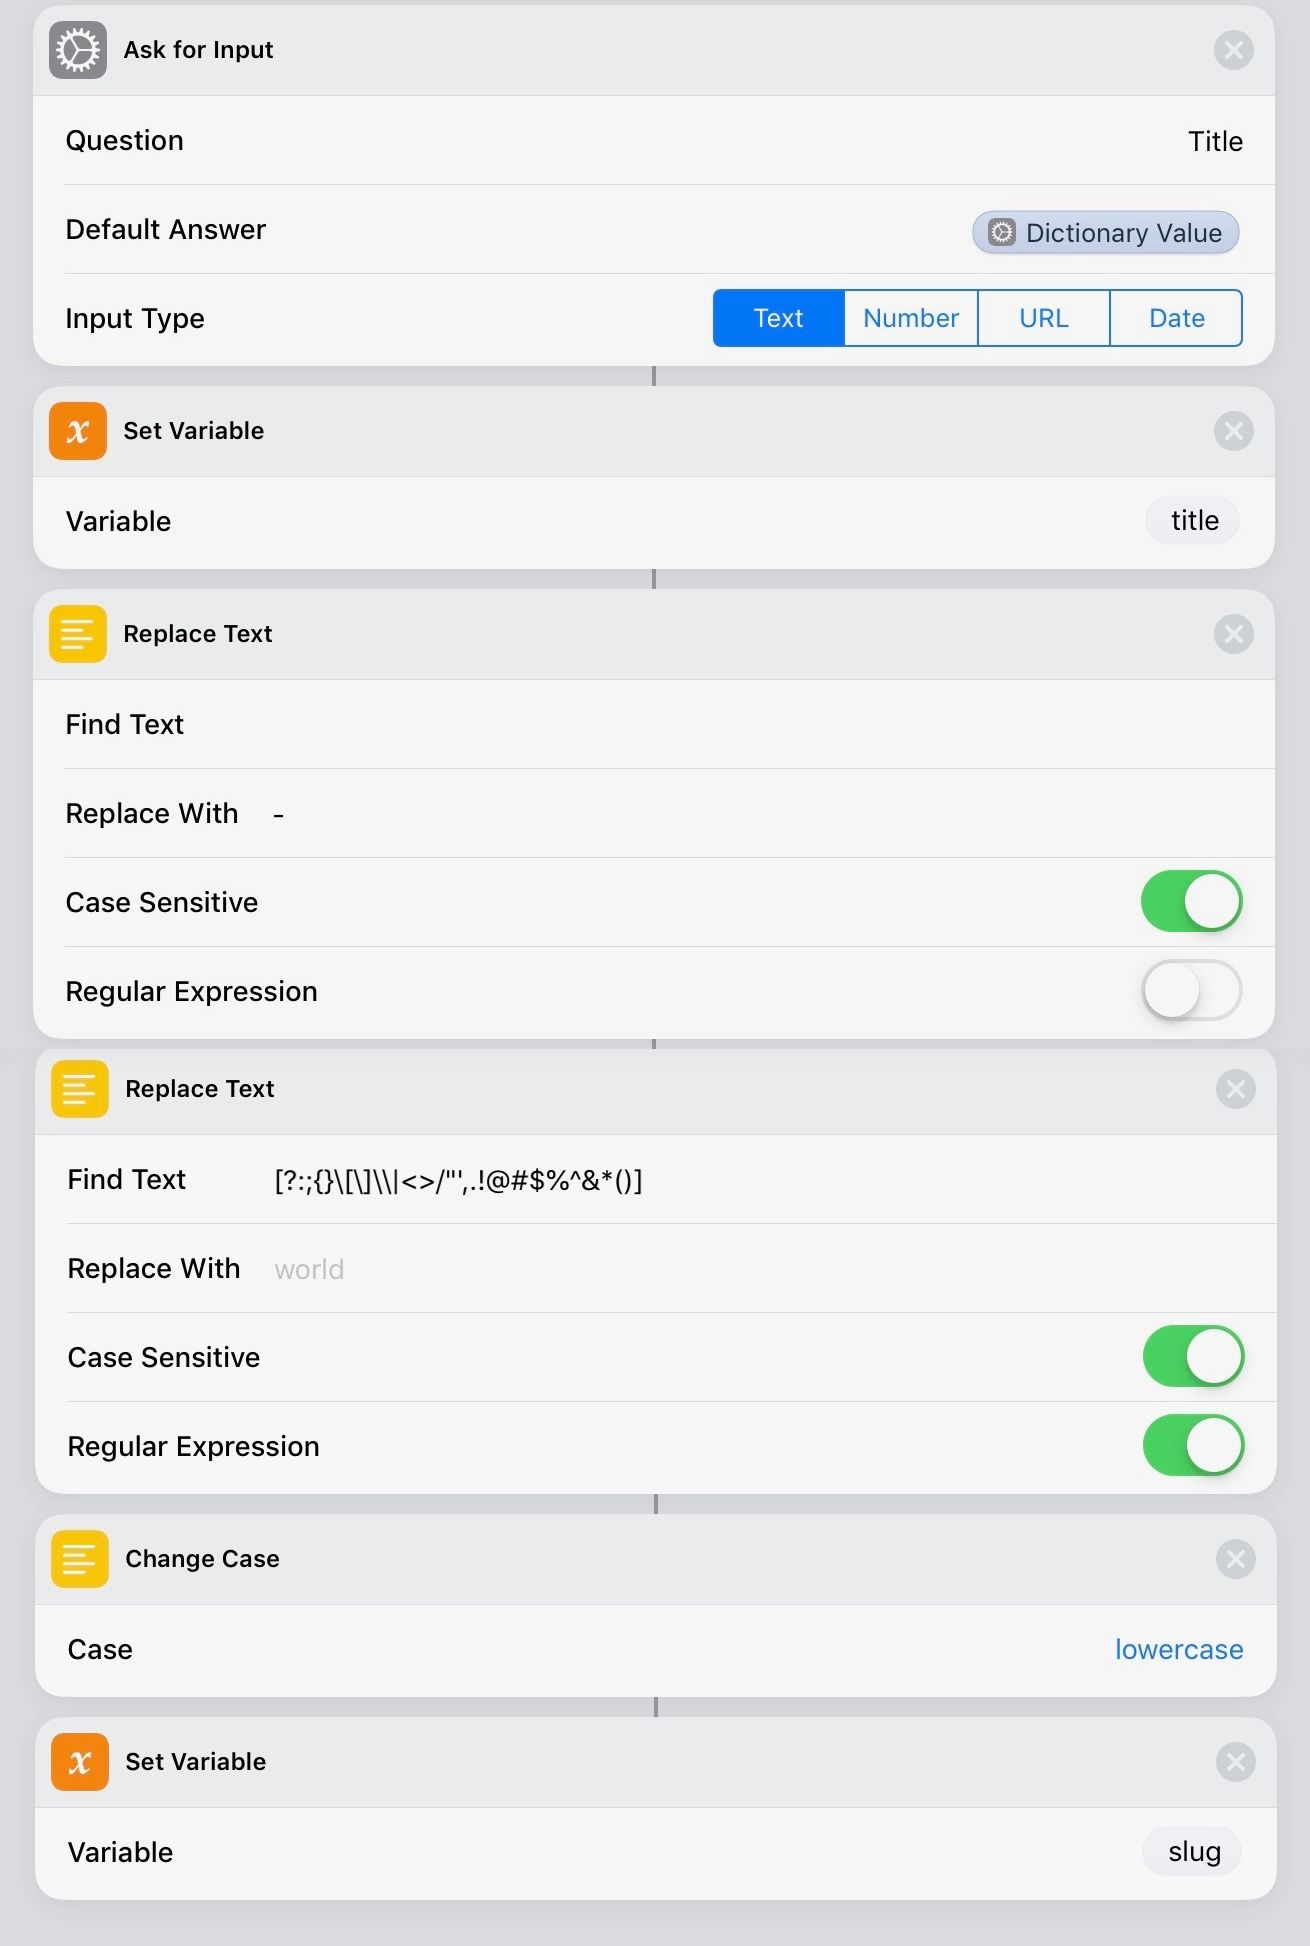
Then, we Ask for Input for the blog post title. I have it set to default to the title we pulled in the last step, but I usually change it. The titles on Instagram are sometimes too long. Type into the popup, and save it as a title variable.
Then, a couple Replace Text actions strip out spaces and punctuation, then Change Case to lowercase and save it as a URL slug variable.
Searching for [?:;{}\[\]\\|<>/"',.!@#$%^&*()] using a Regular Expression covers any punctuation I would use. If you need to add some, just make sure you don’t need to escape any characters. In this expression, I need to escape the brackets and backslashes, because they are RegEx operators. Escape them by adding a \ before each one. (Yes, that’s a backslash to escape a backslash. I don’t write the rules. ¯(°_o)/¯ )

Grab that trusty apiDictionary and pull the thumbnail_url key. This is the path to the thumbnail image of your Instagram post. It’s not the full size image, but it’s good enough for my purposes, which is a thumbnail image on the homepage of this blog. I also use an IFTTT recipe to save the full size image to Dropbox, but that’s a different story.
We then grab the image and Base-64 Encode it. Encoding it with Base-64 turns your image into an impossibly long series of letters and numbers. But, it’s a pretty universal and old-school way to send things like images over text-only channels. In our case, we’ll be sending it over a URL scheme, so it needs to be text. Set that encoded text as the variable thumbnailImage.
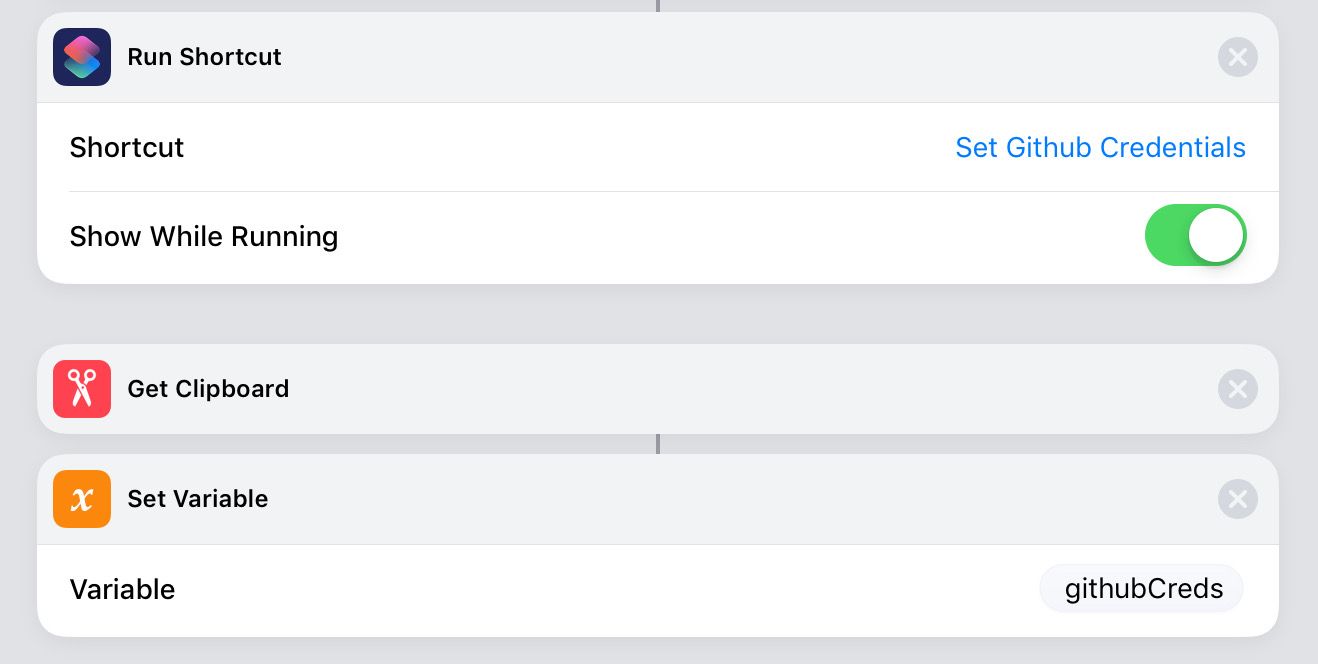
Next, we call my Set Github Credentials sub-routine Shortcut. I keep this separate so I can update all my Github credentials once, and they update in all of my Github Shortcuts. I’ll write up that Shortcut at some other time, but just know this: It ends up copying the &key=[MY WORKING COPY KEY]&repo=[MY REPO NAME] bit of the URL to the clipboard. I’d rather not hop through the clipboard, but that’s the only way to easily pass info between Shortcuts. Hopefully Apple will add Global Variables at some point.
Then, we grab the clipboard and set it as a githubCreds variable so we can reuse it.
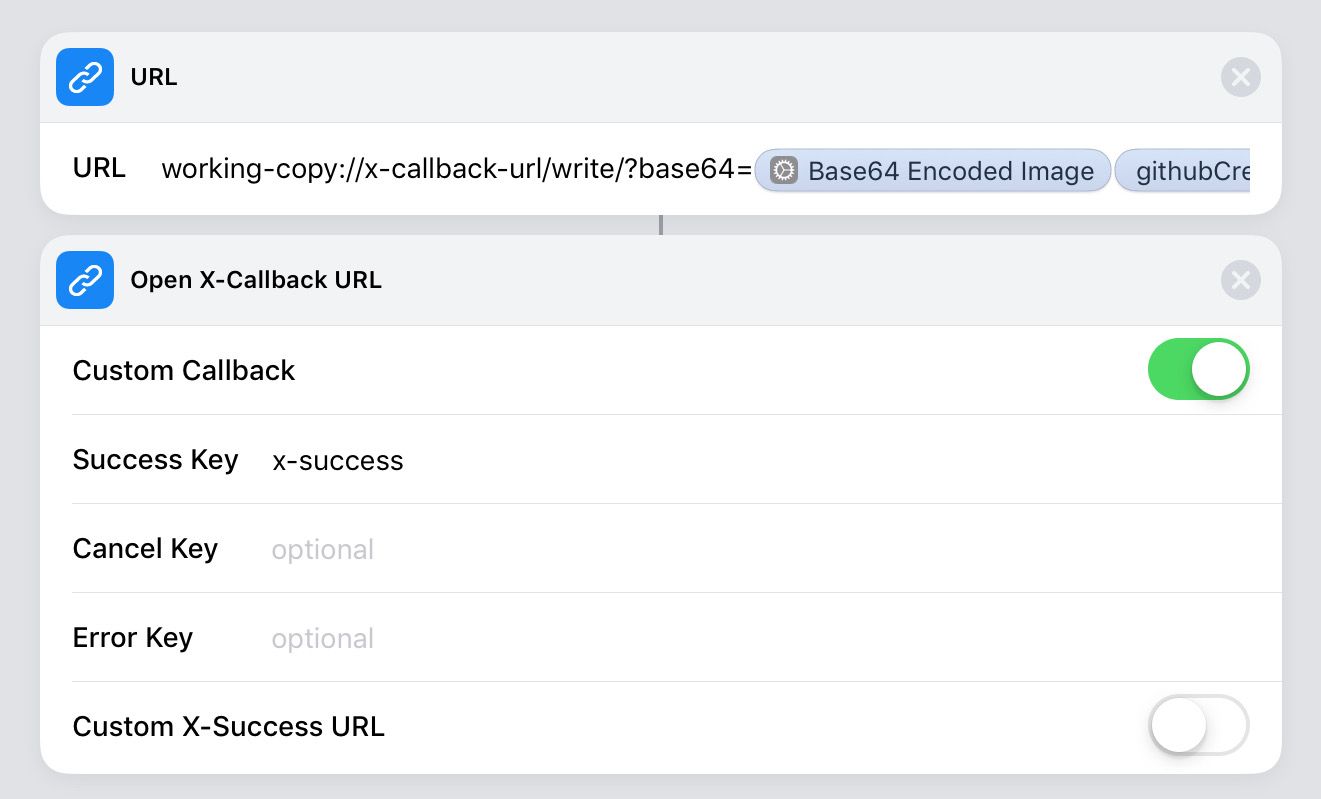
Now the fun part starts. We put together a URL scheme to first send the Instagram thumbnail to Working Copy.
The URL grabs the variables we set before for the Base 64 Encoded Image, the githubCreds and gramID then sends it to Working Copy to the right folder, which for me is assets/img/index/[FILENAME]. Working Copy knows from the write/?base64 bit of the URL to decode the text back into whatever file type it should be. I use the gramID variable to name the image, because why not?
working-copy://x-callback-url/write/?base64=[BASE64 ENCODED IMAGE] [GITHUBCREDS]&path=assets/img/index/[GRAMID].jpg
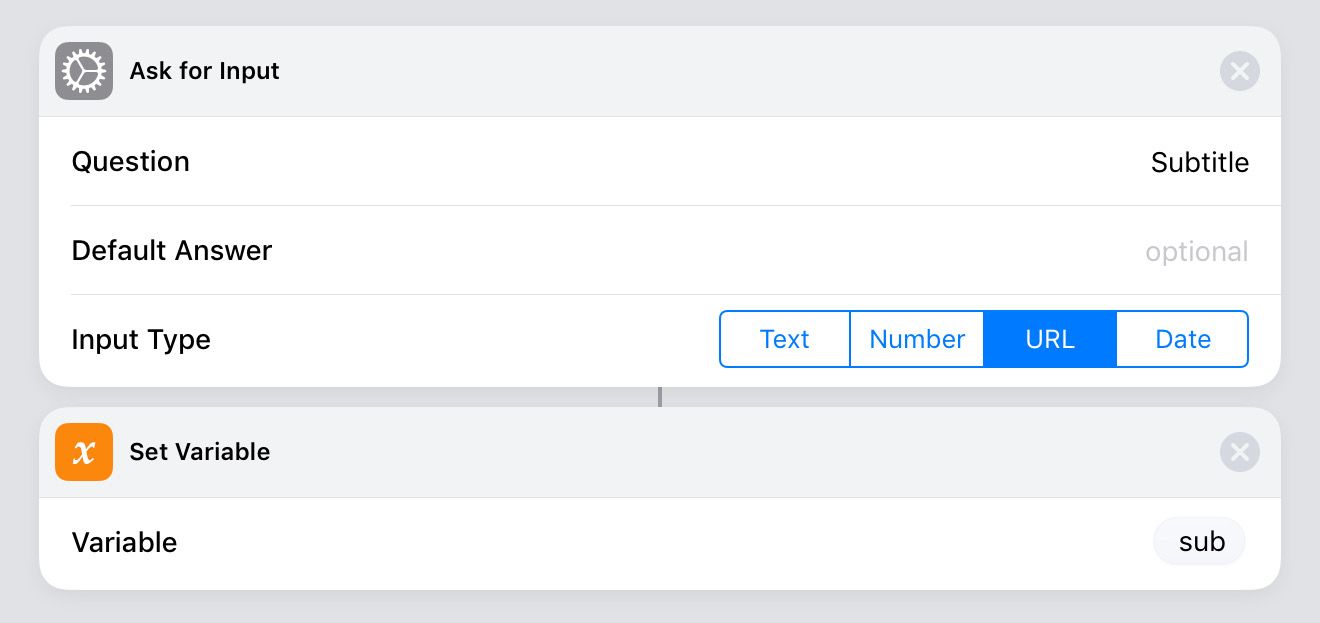
Next, we Ask for Input for a subtitle. I don’t always add one, but sometimes an extra snarky comment is required. Set the variable as sub.
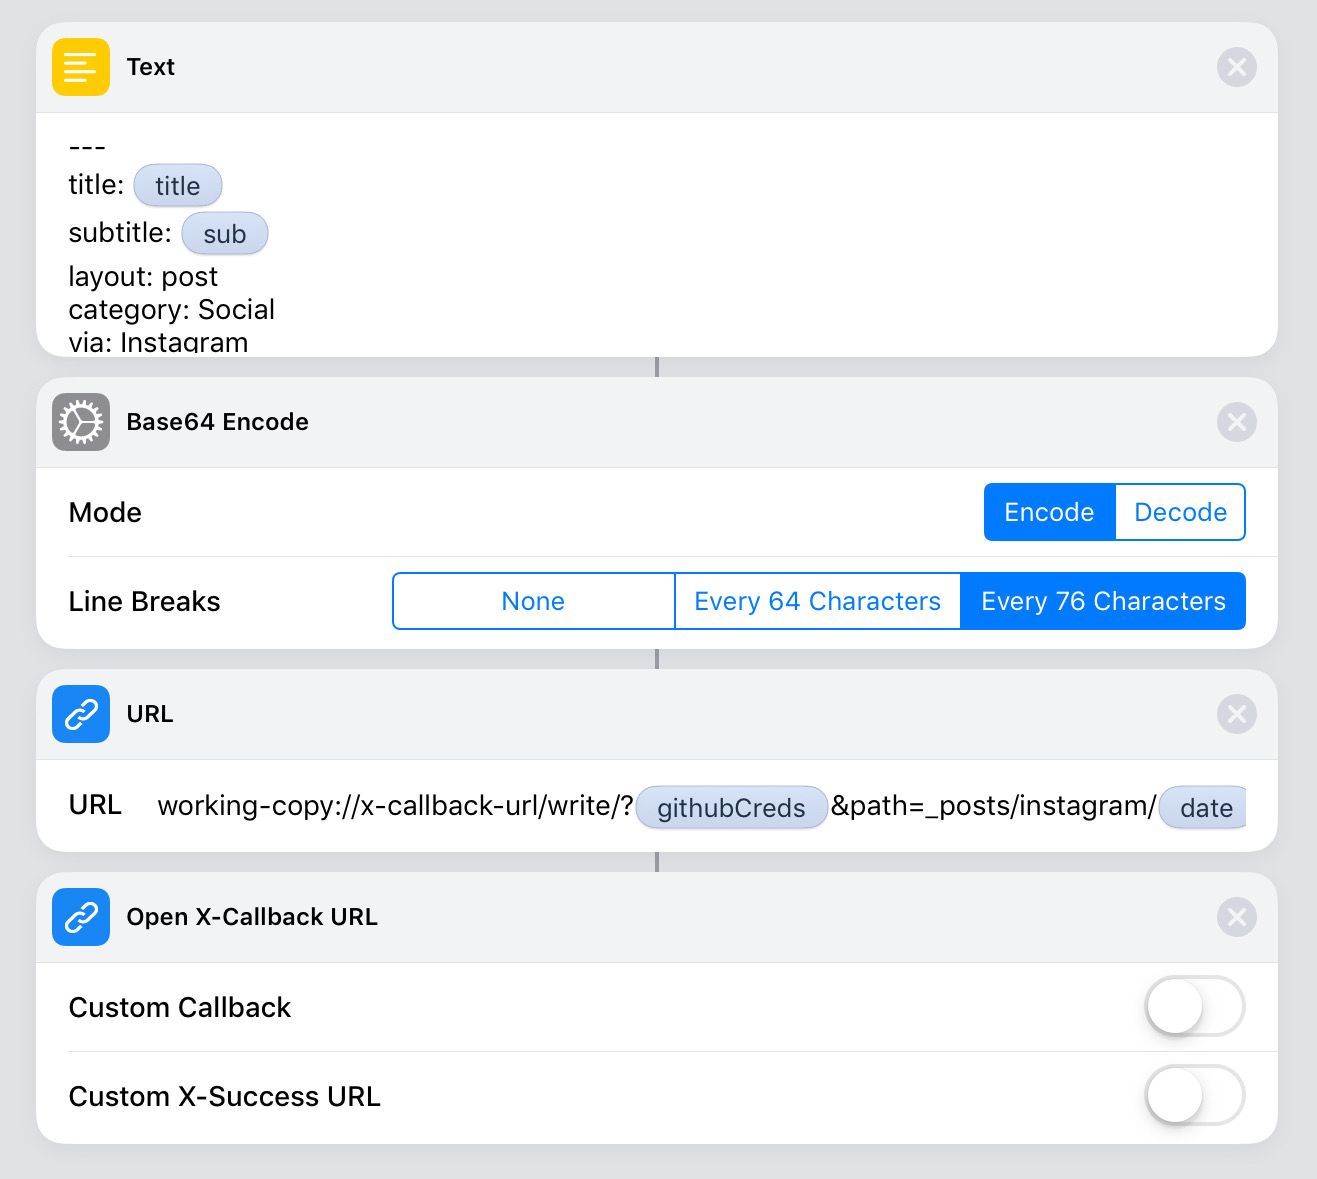
Now, in a Text block, we put together the Jekyll YAML and post.
---
title: [TITLE VARIABLE]
subtitle: [SUB VARIABLE] (If there is no subtitle set, Jekyll will ignore this.)
layout: post
category: Micro
via: Instagram
link: [URL VARIABLE]
tn: [GRAMID VARIABLE].jpg
tags: [INSERT YOUR TAGS]
date: [DATE VARIABLE]
---
[COMMENT VARIABLE]
<!-- more -->
<center>[EMBEDCODE VARIABLE]</center>
Let’s break that down. The title and subtitle are pretty straightforward, pulling the variables we set earlier. The layout and category you should set based on how your Jekyll blog is set up. I use the via tag to set some rules and icons in my blog. If you look in the bottom right of each entry on my homepage, you’ll see a link to the source (and the icon for that service). That’s what the via tag does for me. Totally optional.
Next, a link variable is set to the original Instagram URL. That’s the URL you’ll hit if you click on the source link. My Jekyll setup uses tn as the image on the homepage (and img for the header image on a post), add whatever tags you like, and the date is pulled from the variable we set in the beginning.
That’s it for the YAML, the content is the comment variable, then a <!-- more --> comment, which my Jekyll instance uses to split the “READ MORE” part of the post. Next, the embed code is set. This makes the comment appear next to the thumbnail on my homepage, but allows you to see the entire embedded Instagram in the post
Then, we Base-64 Encode that text block. I’ve tried just sending the text through the URL scheme but it regularly fails if there’s an errant space or weird punctuation. Base-64 Encoding the text evens out all the ripples and makes it fool-proof. Set up a new URL to send the text to Working Copy. The URL pulls in the githubCreds variable again, as well as the date and slug to make the filename, then the Base 64 Encoded text variable.
working-copy://x-callback-url/write/?[GITHUBCREDS VARIABLE]&path=_posts/instagram/[DATE VARIABLE]-[SLUG VARIABLE].md&base64=[BASE 64 ENCODED TEXT]&uti=public.text
Lastly, I made a Working Copy URL scheme to just open the file in Working Copy to double check everything before I commit the changes.
working-copy://open?repo=jimmy-little.github.io&path=_posts/instagram/[DATE VARIABLE]-[SLUG VARIABLE].md&mode=content
It seems really complicated, but it took me longer to write this post than it did to make the Shortcut. And now, it takes a few seconds to post on this site to permanently save any Instagram posts I make.
If you’re interested, here is the full Shortcut, in all its screenshot glory.
